Learn Crane Pose
The crane is a symbol of youth and happiness throughout Asia. In China, it’s also a sign of longevity. Bakasana, or Crane Pose, embodies all three. Getting into the posture requires a playful, youthful leap of faith, and once you are safely balancing in Crane, you’ll feel a sense of lightness and joy. It is ultimately a fun pose that will keep you spry.
Full Bakasana, or Crane, is done with straight arms, knees in your armpits, and the buttocks as high in the air as possible. You may be more familiar with its sister pose, Kakasana, or Crow—a modified version in which the arms stay bent, and the knees come to the outside of the triceps—but we’re going for the full expression here. The first trick to mastering this dynamic balancing pose is to breathe through and past the common fear of falling on your face.
Second, you’ll need to build up and rely on a foundation of strong core muscles, which will help you pull your knees up near your armpits and stay buoyant and light in the pose, taking weight off the wrists. Core strength can be developed through a regular practice of postures that engage the abdominals, such as Plank, Side Plank, and Navasana (Boat Pose). And third, strong shoulders, arms, and hands are also important in this posture, as they support your body weight. Arm and shoulder strength can be built up by practicing Virabhadrasana I (Warrior Pose I ) and Virabhadrasana II (Warrior Pose II), both of which require you to hold your arms up or out for long periods of time, and Chaturanga Dandasana (Four-Limbed Staff Pose). While you are working on strengthening throughout the core and arms, try the two preparatory poses below, including modified Bakasana, to begin adding hip flexibility and to get you physically and mentally comfortable with tipping forward and up into Bakasana.
The first prep pose is modified Malasana (Garland Pose), a deep squat that will help you open up all of the gluteal muscles and allow deep flexion, or bending, at the hips. The ability to fully flex your hips is essential, along with core strength, to getting your knees up high on the backs of your arms. Flexible hips, core strength, and mindful attention are key to holding the legs in place and staying in Crane.
Once you feel secure with your knees up near your armpits, practicing modified Bakasana, with props and your feet still on the ground, will get you used to the idea of tipping forward and balancing on your hands and arms. Start by placing a block, either on the tall or short side, where your head will land when you do tip forward. Rest your head on the block and lift one foot at a time. With practice, you’ll be able to lift your head off the block, employing the strength of your core and arms to hold yourself in Crane. Remember: Moving mindfully is key. You can’t just throw yourself up into the posture and hope to balance when you get there; you need to stay in balance all the way up. Using the block can restrain the urge to launch yourself up into the posture, and prevent you from tumbling over.
When you do reach full Crane, even if you tumble, remember that it’s a short way down and you’re in good company—almost no one gets into the full pose the first time. Do the best you can. And practice.
Push Past Fear
It is often the fear of failure that 
prevents us from taking risks. And 
failure, in Crane, could mean falling flat on your face, literally. But there is a middle ground between playing it safe, with your feet on the ground, and throwing yourself thoughtlessly into risk. If you mindfully forge ahead, taking the steps you need to build strength and confidence, you can reap the truly joyful rewards of pushing past your perceived limitations. More often than not, when you move out of your comfort zone, you realize that you have more potential than you thought. Finding this middle path, and playing this edge between immobility and freefalling, can help you find balance in Crane and move you closer to knowing your true self. Not only can this inspire change in your own life, it may also motivate others to push past their fears and limitations, too.
Step 1: Modified 
Malasana
Set Up
Come to a squatting position 
with both feet together. If this 
bothers your knees, sit on a block.
Keep your feet together and let the heels sink (if they are not already on the floor) to help stretch out the backs of your calves, your Achilles tendons (backs of the ankles), and the plantar fascia tendons (bottoms of the feet), all of which get tight from running, walking, and sitting.
Separate your knees and hang your torso between your legs, stretching the gluteus and low- 
back muscles, or hip extensors. These muscles work in opposition 
to the hip flexors (the muscles you use when bending forward), and when the extensors are tight, they can inhibit your ability to fully flex 
at the hip joint.
Refine
Bend forward as best you can. Use your hands or forearms to support some of the weight of your torso, or if you are flexible enough to fully flex at the hips, move your shoulders into position between your knees and if possible take your head all the way forward to the floor.
This is a totally passive posture. Let the head and neck hang forward if that feels good, or hold the head 
in a neutral position.
Finish
Relax and breathe. Keep your 
eyes open. Find a drishti (gazing point) off the tip of your nose and hold for 5–10 breaths. See if you can allow yourself to relax more deeply with each exhalation.
Step 2: Modified Bakasana
Set Up
Come to a squatting position. Separate the feet about hip-width apart and the knees about shoulder- width apart. Depending on the range of motion in your ankles, your heels may be touching the ground, or not. For most of us the heels will be off the floor; just let them hang—don’t use muscular strength to hover.
Press your knees into the backs of your triceps.
Place a block, either on the short or long side, where your head will land when you tip forward.
Plant your hands flat on the floor directly in front of you and about shoulder-width apart. Keep the fingers and palms spread wide and active, pressing equally into all parts of the hand and tips of the fingers.
Refine
Start to slowly lean forward, putting more weight into your shoulders and on your hands and the backs of your arms.
Place your forehead on the block for support, to help alleviate the fear of falling on your face. Move slowly, playing with balance, and trying to get to the point where you don’t need the block.
Core strength begins to kick in here. Keep lifting with the abdominal muscles to pull energy up and give you the sensation of being lighter. 
If your knees slip, try wearing shorts and a tank top and forgo moisturizer (skin sticks to skin).
Arms stay bent.
Keep leaning forward, coming up on your toes, and once stable, pick one foot up off the floor. Place the foot down and try the other side.
Finish
Breathe. Hold each side for 
5 breaths or as long as you can.
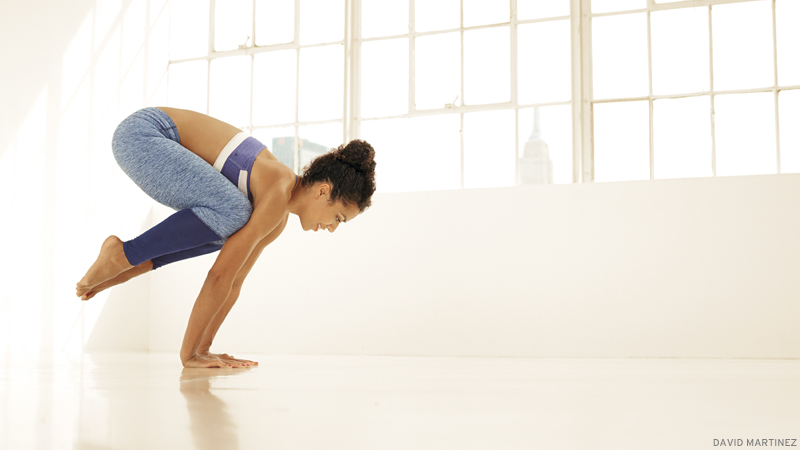
Step 3: Bakasana
Set Up
Come to a squatting position. Separate the feet about hip-width apart and the knees about shoulder-width apart.
Try to get your knees as high up on the backs of your arms as possible. (The more you can bend in the hip joints, the higher you will be able to take your knees.)
Push the backs of the arms into the knees, creating a tight seal between the armpits and the kneecaps.
Plant your hands flat on the floor directly in front of you and about shoulder-width apart. Keep the fingers and palms spread wide and active, pressing equally into all parts of the hand and tips of the fingers.
Begin to tip forward to the point where both feet lift off the floor. The key to balance is the gaze. Once you can tip forward without the block, look up as high as possible. This will help keep you from falling forward.
Again, move slowly, feeling balanced at every point. Don’t rocket up into the pose, hoping to find balance once you arrive!
Refine
Once you get comfortable with balance, begin to experiment with lifting your belly and pelvic floor, and straightening the arms. Core strength can help again: As your abdominals grow stronger, you are less likely to rest your weight on 
the backs of your arms.
Finish
Breathe. Hold for 5 breaths or as long as you can.